| Christmas |
Christmas Gifts
Christmas Store
Christmas Ornaments
Christmas Movies & Books
Christmas Stockings
Christmas Trees
Christmas Wreaths
Christmas Gift Baskets
Christmas Games & Fun
Christmas Printable Games
Christmas Clip Art
Crafts
- Dough Ornaments
- Luminaries, Gingerbread House
Gift Giving Help
Gift Questions for Givers
Create Your Gift List
|
|

 
|
| Christmas Fun |
Big & Mini Christmas Trees

Choose from real Christmas trees, prelit artificial trees, decorated mini Christmas trees and colored trees too. View Christmas trees.
Charlie Brown Tree
 Unique Christmas items and Gifts
Charlie Brown Tree
Holiday Bobble Heads
Magic 8 Ball Santa
Reindeer Car Costume
Inflatable Outdoor Displays

Looking for amazing outdoor displays, check out the airblown Santa and reindeer plus other yard decorations.
Personalized Christmas Angel
 This Angel offers holiday greetings and good tidings to your guests. View this an other home decor. This Angel offers holiday greetings and good tidings to your guests. View this an other home decor.
Santa Costumes
 Whether entertaining at the office party, dressing up for the kids or volunteering for a charity these Santa costumes are perfect.
Collectible Ornaments
 Add sparkle to your tree with these collectible ornaments from Disney, Lenox, Kinkade and more. More Christmas ornaments here. Add sparkle to your tree with these collectible ornaments from Disney, Lenox, Kinkade and more. More Christmas ornaments here.
Printable Christmas Games
Whether for a Holiday classroom activity or party, Christmas Bingo, Word Finds and Trivia games will keep them entertained.
Holiday Movies and Books
Christmas movies like Its a Wonderful Life, Miracle on 34th Street, The Santa Clause and wonderful Christmas books at great prices.
Christmas Party Favors
Choose from snowflake, framed ornaments, holiday mint tins, personalized candy bars, bottle stoppers and other holiday favors.
|
|
|
| Gingerbread House - Holiday Craft |
Few things are as interesting, challenging and fun during the holidays as making a Gingerbread house, while there are kits and pre-made gingerbread houses out there you and your family is sure to have more memories making your own.
A great activity for kids and if things go wrong, you can eat the Gingerbread house.
Additional Holiday Crafts pages
Dough Ornaments, Luminaries, Popcorn Ball Recipes
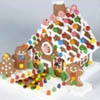
| Make a Gingerbread House |
Gingerbread House
This is more personal than the traditional preplanned kit houses. The pieces can’t possibly be perfectly matched working this way, but the crudeness is
extremely charming. Also a great deal of measuring and planning is eliminated, leaving time for much fun and decorating. The kids feel like it’s their creation. It is their very own house that they’d like to live in.
Materials:
- Approximately 6 boxes of Betty Crocker gingerbread mix
- Shirt cardboard
- A variety of candy trimmings such as M&M’s Candy kisses, red-hot hearts, gumdrops, shredded coconut (for snow), candy canes, peppermint circles, sour balls, colored chocolate balls and miniature Santas.
- Icing
Directions for a Gingerbread House
1. Begin with a child's drawing of his or her house.
2. Roll the gingerbread out on a large cookie tin.
3. Cut out the child's paper drawing to use as a pattern.
4. Use a knife to cut out each piece of gingerbread. You will need two identical
pieces for the front and back and two for the sides. You will also need two
pieces for the roof. Measure these carefully so they are large enough.
5. Cut four pieces for a chimney, if desired, and one for the front door. Cut away a triangle shape in the middle of two chimney pieces if they are to fit over the peak of the roof.
6. Make lines crisscrossing the roof pieces to simulate roof tiles.
7. Cut out sections where windows are indicated. Little extra details can be made as well: a tiny doorknob, window boxes, a porch- all made with gingerbread.
8. Bake the gingerbread according to the package directions.
9. Place a medium sized pan on the low burner of your stove and pour about two cups of sugar into the pan. This will begin to boil. Keep stirring so that it doesn't burn. It will begin to look like molasses. Use this to glue the sections of the house together. The mixture gets very hot and will cause a bad burn if it gets on your skin. Keep the children away from the stove while doing this.
10. When building the house, work quickly before the sugar cools. Hold the back section of the house in one hand and one side in the other. Dip the edges that will be joined into the hot sugar so that these two edges are completely coated. Hold together while placing them upright on the cardboard.
11. Join front and opposite side pieces in the same way.
12. To join these two "L" shapes, dip a knife into the hot sugar and spread it over the edges. Stick the house together and hold for a second or two while cooling.
13. Spread the sugar on all exposed edges and attach the roof pieces carefully. Do not press down too hard. Something may crumble.
14. Join the four sides of the chimney in the same way. Then spread the sugar over the bottom edge of the chimney and attach to the roof peak where it will look best. Fill in where necessary with sugar and keep in mind that anything can be covered up with frosting and decorations.
15. Make icing with confectioner's sugar, water and egg white, or use pre-made
icing.
16. Squirt frosting along all seam lines and around windows and the doorway for a
ruffled effect. This will cover up the dark sugar lines where pieces connect.
17. Empty packages of candy into different bowls and let the kids decorate as they see fit. Tiny marshmallows make the best bushes around the house and for lining a path. Gumdrops can be useful for this as well. Sprinkle coconut over the roof and around the cardboard.
More Holiday Crafts Kits and Activities
|
|
|
|
|
|